今天谷歌浏览器Google Chrome稳定版迎来v68正式版首个版本发布,详细版本号为v68.0.3440.75。所有未加密的网站都会在地址栏上明确标记为“Not Secure”(不安全)
那么对于我们的个人小博客来说,如何安装SSL证书呢?
之前文章提到过,本站是建立在LAMP之上的,接下来的一系列操作,也是以这个为前提。
安装免费的SSL证书
Let’s Encrypt是一个于2015年三季度推出的数字证书认证机构,旨在以自动化流程消除手动创建和安装证书的复杂流程,并推广使万维网服务器的加密连接无所不在,为安全网站提供免费的SSL/TLS证书。
LNMP1.4集成了一键申请、安装和自动更新 Let’s Encrypt 的免费SSL证书。安装起来相对容易轻松很多。
# lnmp ssl add
在接下来输入的内容中,请务必要确保域名和网站路径正确,否则会出现各种问题。
Your domain: lymsaga.top
Enter more domain name(example: lnmp.org *.lnmp.org): www.lymsaga.top
domain list: www.lymsaga.top
Please enter the directory for domain lymsaga.top: /home/wwwroot/lymsaga.top
Allow access log? (y/n) n
Disable access log.
Please enter Administrator Email Address: your email
Server Administrator Email:your email
1: Use your own SSL Certificate and Key
2: Use Let’s Encrypt to create SSL Certificate and Key
Enter 1 or 2: 2
接下来程序会自动安装SSL证书,直到出现
Test Apache configure file…
test apache configure… Syntax OK
done
Restart Apache…
Restart apache… done
就说明证书安装成功了。
但是!!!博主的安装过程并非如此一帆风顺,首先遇到了 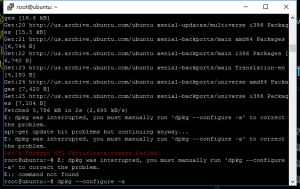
醒目的红字Let’s Encrypt SSL Certificate create failed!提醒我安装失败。
往上面看原因“dpkg was interrupted….”
嗯,虽然出错了,还是很人性化的,直接告诉了解决方式
# dpkg --configure -a
如果问题没有解决可以尝试:apt-get install -f。之后再dpkg –configure -a(未测试)
之后重新安装ssl
然而,遇到了第二个问题。
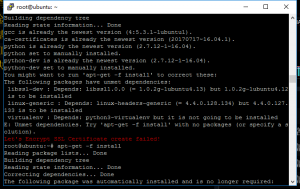
嗯,一些packages的dependencies有问题,这次是输入
# apt-get -f install
完成之后再一次安装
# lnmp ssl add
之后输入的内容和前文中的一样,注意不要输错了。
终于成功了!!
用HTTPS替换掉原HTTP链接
博客中原来的一些图片,素材等可能仍然存在HTTP链接,我们可以使用PHPmyadmin来一次全部替换掉。
如果之前在安装LAMP之后没有对phpmyadmin文件夹的名称做修改,那么在浏览器地址栏输入IP/phpmyadmin,如果修改过文件夹的名字,那么就输入IP/新文件夹名,打开PHPmyadmin。
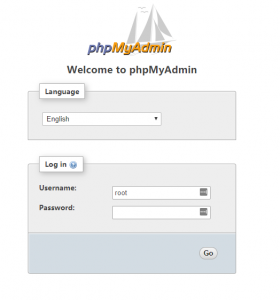
用户名root,密码是你数据库的密码。
之后选择你的数据库,运行
UPDATE wp_options SET option_value = replace( option_value, 'http://www.lymsaga.top', 'https://www.lymsaga.top' );

UPDATE wp_posts SET post_content = replace( post_content, 'http://www.lymsaga.top/wp-content', 'https://www.lymsaga.top/wp-content' );
全部替换就完成了。
使用https打开你的网站,
![]()
解决证书的“Certificate Chain” issue
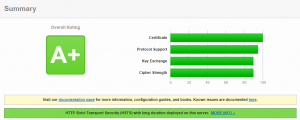
完成上述步骤后,有兴趣的童鞋可以在SSL Labs
上检测一下自己的网址,通常会出现如下提示:
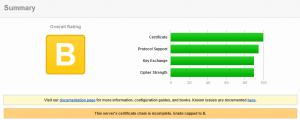
上面标出了是“Certificate Chain is incomplete”,简单来说就是中间证书/证书链不完整,需要手动安装/添加这个证书并开启强制HTTPS访问。
编辑网站的配置文件,仍以本博客为例:
# nano /usr/local/apache/conf/vhost/seoimo.com.conf
在VirtualHost 67.89.123.45:443项下添加两行命令:
SSLCertificateFile /etc/letsencrypt/live/lymsaga.top/fullchain.pem
SSLCertificateKeyFile /etc/letsencrypt/live/lymsaga.top/privkey.pem
SSLCertificateChainFile /etc/letsencrypt/live/lymsaga.top/chain.pem
Header always set Strict-Transport-Security “max-age=63072000; includeSubdomains;”
保存之后,重启Apache:
# lnmp httpd restart
之后再去测试,就可以得到A以上的分数了。
更新SSL证书
LNMP1.4安装 Let’s Encrypt – SSL 证书后,会自动添加定时更新证书的指令。
查看:
# crontab -l
正常的情况下,会显示如下信息:
这里默认免费证书有效期90天,7天检测,如果你感觉有点太频繁。可以改为15天甚至更长时间:
# crontab -e
更改为以下设置:
重启 crond
# service cron restart
cron命令在老版本系统上为crond
你也可以随时强制性手动更新
# /bin/certbot renew --renew-by-default --disable-hook-validation --renew-hook "/etc/init.d/httpd restart"
出现下图表示更新成功:
/etc/letsencrypt/live/lymsaga.top/fullchain.pem (success)